I'm very excited to continue this series on digital photography basics! I often have people contact me with questions after receiving their first DSLR camera and I hope this series will provide you what some helpful information to get you started on your photography journey! I received my first DSLR about six years ago and I felt pretty lost and overwhelmed in the beginning. There's so much to learn! But if you work hard and practice, I know you'll make progress and will be happy with the beautiful images you get as a result! I think photography is a skill that is so important to learn because it gives you the ability to capture important memories in a beautiful and artistic way!
1. Part One: Getting Started
2. Part Two: Understanding Exposure
3. Part Three: Understanding Gear
4. Part Four: Understanding Post-Processing
Getting it Right in Camera
This step is SO SO important! Really, I can't emphasize this enough! People seem to think that Photoshop has magical powers and that you can take a really poorly exposed picture and then just fix everything in post-processing. While there is a lot that Lightroom and Photoshop can do, that is SO not the case. Your images will always look better if you get them properly exposed in the camera as you possibly can. That's why it's so important to learn how to understand exposure and how to understand your gear.
RAW vs. JPG
I shoot all of my images in RAW and I would encourage you to consider doing that as well. Here's a few of the differences between RAW and JPG:
JPG
Jpeg files are processed right in the camera. The camera adds blacks, contrast, brightness, sharpening, etc. and then renders the file to a compressed .jpg. Because the file is compressed, a lot of the original information in the image is lost when it is saved as a .jpg.
RAW
RAW files are uncompressed and unprocessed images and they are much larger files than .jpgs.
While RAW files are undoubtedly a far superior format to the .jpg because of all of the information you get from the file and the amount of changes you can make to the file, there are benefits to both image types. Shooting in .jpg can be helpful when you want to display an image right away or when you don't have post-processing software to edit your images. .Jpgs are also beneficial because they're much smaller files and so they don't take up nearly as much space on your computer or external hard drive. I often shoot in .JPG when I'm taking pictures on vacation and don't want to have to deal with a lot of editing or really large files. Shooting in RAW is best when you are in difficult or changing lighting and you want to have the ability to have enough information to edit exposure, white balance, etc. in post-processing. Shooting in RAW is also best really any time you want to have much more control over and flexibility with your image. You do need to keep in mind that if you shoot in RAW, you must do some post processing (even though it can be very minimal) because no post-processing is done for you in the camera. Another thing to keep in mind, you want to make sure that after you edit your file, you export it as a .jpg. You don't ever want to use RAW files for web or print use, they need to be edited and converted to a .jpg and then they're ready for web or print.
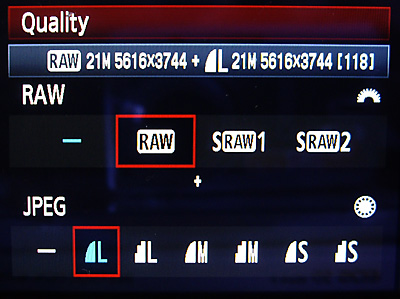
If you're unsure whether or not you want to shoot in RAW or .JPG, you can always shoot in both (as pictured below). This takes up more space but it gives you the option to work with both types of files! I did this a lot when I first started in photography and was still learning how to edit RAW files.
Adobe Lightroom
Adobe Lightroom is the editing software that I use 95% of the time. I use Photoshop the other 5% of the time when I need to do more major editing like photoshopping an object out of an image, making major cosmetic changes, etc. I love Lightroom and I find it pretty easy to use! I'm definitely not a software guru and I know Lightroom has a lot of features I'm not even aware of (I'm always trying to learn more about Lightroom and about post-processing and I have a long way to go!). Lightroom has also become pretty affordable! I am on a plan with Adobe where I pay $9.99/month for Lightroom and Photoshop. There's a lot more I could go into with Lightroom and I may do future posts about it, but for now, here's a few good resources: Creative Live, Digital Photography School, and Lynda.
My Preset
When editing, I make very minor changes because I like for my pictures to look very natural. I typically adjust the white balance to make my pictures warmer or cooler depending on what they need. Then I use a standard preset I've created in Lightroom to make the following adjustments:
Exposure: +0.34
Contrast: +15
Highlights: -25
Shadows: +15
Blacks: -5
Vibrance: +10
I almost always make further adjustments to my images because each picture has different needs based on lighting, white balance, etc. However, using the preset I created gives me a good starting point. I encourage you to play around and figure out your "style" because everyone is different and prefers different things!
I hope you found this helpful! If you're enjoying this series, please share it when friends and leave me feedback on other questions you have or posts you'd like to see!


