For Photographers

7 Tips for Surviving A Double Header Wedding Weekend

I have a "double header" wedding weekend (i.e. two weddings in one weekend) coming up this weekend and so it got me thinking about advice I would give to photographers who are considering or who have a double header weekend. I have shot a few double header weddings weekends before and have certainly learned from them! I actually like shooting double headers! It typically means that you're "all in" for work one weekend, but that you may have another weekend in the month completely free. Here's a few tips of advice:

1. Book Weddings that are Close
Whenever I've booked two weddings in one weekend, I've only done it if both weddings are within fairly close proximity to each other. I would not want to have to drive more than an hour to shoot each wedding if I'm doing them back to back. The idea of driving through the night after a wedding to get to a second wedding in another destination sounds dangerous, exhausting, and unwise to me! 

2. Prepare Well
Communicate well with your clients and make sure you have timelines and wedding details figured out well before the weekend so you're not stressing about making plans for 2 weddings. Also, make sure you lay out all of your equipment in advance, clear memory cards, etc. I would also recommend making sure you have enough cards to shoot both weddings. Even though I always download images from weddings the night of or the morning after the wedding, I like knowing I have enough spare cards for 2 in case something happens with the images or I can get them downloaded for some reason.

3. Get Sleep
Do your best to get plenty of sleep before the weekend! You'll definitely want to be well rested since shooting two weddings back to back is exhausting and tough on your body!

4. Drink Water
Make sure you stay hydrated! It's easy to forget to drink water in the midst of a hectic wedding schedule, but it's important that you get enough water. You especially want to make sure you stay hydrated since you will have to go straight into another wedding the next day. I always carry my Swell bottle with me to weddings and sip on it throughout the day.

5. Give Both Days Your All
Remember that each wedding day you're photographing is an VERY significant day in the life of each couple! Each couple has a unique love story and deserves to receive your best work. Remember the importance of the day and the value of my clients memories keeps me motivated to work hard and push through exhaustion!

6. Wear Comfortable Shoes
Make sure you wear comfortable shoes or your feet will NOT be happy at the end of day 2. I always struggle with wanting to look professional and stylish, but also knowing I need comfort. For outdoor weddings, I typically wear crocs flats. Crocs flats are certainly not the most stylish thing, but they handle grass, mud, and rain so well and they are super comfortable and supportive! For indoor or dressier weddings, I usually wear my Sam Edelman flats, lace up flats, or Old Navy flats (surprisingly comfortable for being so cheap!) For winter weddings, I LOVE wearing my Naturalizer boots!

Here's a few shoe options:
Crocs Flats
Naturalizer Boots
Old Navy Flats

Tieks (I don't personally have these but I would LOVE to have them! I hear amazing things and my mother-in-law just got a pair and I tried hers on and was amazed at how supportive they are! I love the brown, poppy, pink, and red).
Sam Edelman Flats
Yosi Flats
Tory Burch Flats

7. Plan for a Day Off
Definitely plan to take the day after your 2 weddings off! Don't schedule any meetings or anything and plan to sleep in and get some much needed rest. Trust me, you'll be glad you did!!
5 Business Tips I Learned from "Jiro Dreams of Sushi"

This weekend my husband Alex suggested that we watch a documentary called “Jiro Dreams of Sushi.” Neither one of us are extremely interested in learning about sushi (although we both love sushi!) but we heard that it was an excellent documentary about the world’s greatest sushi chef. I’m always amazed by and interested in learning from people who are “the greatest” at their profession or skill. I’m SO glad we took the time to watch it because it was really inspiring and actually taught me so many lessons that are applicable to my photography business (or to any small business owner!). Here’s the top 5 business tips I took away from “Jiro Dreams of Sushi:”

1)   Success Doesn’t Happen Overnight and It Requires a LOT of Hard Work
In our world of instant gratification and instant everything, it's easy to expect that our businesses will be an overnight success. It's also easy to compare our businesses to what we see on Instagram and to get discouraged when we don't instantly have the amount of followers, the beautiful pictures, or the businesses we constantly see before us. In "Jiro Dreams of Sushi" there was a quote that I really liked:

“A great chef has the following 5 attributes: First, they take their work very seriously and consistently perform on the highest level. Second, they aspire to improve their skills. Third is cleanliness. If the restaurant doesn’t feel clean, the food isn’t going to taste good. The fourth attribute is impatience. They are not prone to collaboration. They’re stubborn and insist on having things their own way. What ties these attributes together is passion. That’s what makes a great chef.”

Ok so some parts of the quote are more applicable to photographers and small business owners than others . But what I took away from this description of what a great chef is, is that I must take my work seriously and consistently produce high quality pictures and an amazing client experience. It is extremely difficult to consistently produce great work no matter what the circumstances are and it requires a lot of learning and hard work. In addition, I must be driven and passionate about what I'm doing. It is imperative to, essentially, be a perfectionist and to never give up trying to achieve higher and higher levels in your business and your work.

2)   Never Stop Learning and Growing in Your Craft

Even when he's in his 80's, Jiro is still thinking of new ways he can improve in his craft of making sushi. He says that he still doesn't feel that he has perfected his work or his restaurant. Even though he's world-renowned and recognized as the greatest sushi chef, he is still innovating, thinking, growing, and learning! That is pretty amazing and requires a great degree of humility and passion! I certainly want this to be true of me. I never want to stop learning, reading, growing, and striving to get better and better at what I do. Watching this documentary challenged me to be a better reader and so I just picked up How to Win Friends and Influence People and Selling The Invisible so that I can continue learning and growing in my business knowledge.

3)   Simplify and Specialize

Jiro's restaurant only serves sushi. No appetizers and no other options. They focus on and perfect the combination of fish and rice that their customers make reservations for months and years in advance. Jiro also repeats the same routine over and over again every work day and he makes minor changes and improvements to his routine over time. I took a lot away from this. As a photographer, it's easy to feel like I should be a good fit for every person that contacts me and that I should be able to photograph everything and anything that comes my way. However, I think there's SO much wisdom in specializing in something and getting really, really good at it. This is something I really want to work on this year. I feel like this is a weakness of mine and that I need to do a better job of determining my specific niche and my ideal client and then simplifying and focusing on what I enjoy most and am best at.

4)   Love Your Work and Be Ready to Make Sacrifices

It is clear throughout the documentary how much Jiro loves his work (I mean the guy is still working in his 80's and doesn't want to retire!) and additionally, how many sacrifices he makes for his work. Especially in the beginning of his business, it was not uncommon for Jiro to work 80+ hours a week and the only time he takes days off is for national holidays. Jiro sacrificed time with friends and family to create a successful business. I do feel the need to say that I don't totally agree with Jiro's view on work and how much work consumes his life. I would like to achieve more work/life balance in my life and I want to be sure to always put Christ, the Church, and my family before work. I never want work to become my idol or let the successes or failures of my business define who I am as a person. However, I do think that it is necessary to love your work, to be incredibly self-disciplined, to work hard, and to make sacrifices if you want your small business to succeed. Owning a small business is not really a 9-5 job and it's not something you can clock in and out of whenever you want. At the same time, I do think it's important to have balance so that you don't get burned out or neglect the things that are the most important in life. Just be prepared for some long hours and a lot of hard work (especially in the beginning!).

5)   Create a Holistic Experience

This was a fascinating aspect of the documentary to me. Jiro and the workers at his restaurant do an excellent job of creating a holistic experience for their clients. They only have 8 seats at a bar in their restaurant and they plan the entire experience from where each guests sits, to a hot towl served at the start of the meal, to each individual course, and so many other details. The commentator in the documentary describes it as a symphony where Jiro picks each course of sushi to complement the one served before it. Each course builds and their are crescendos and peaks in the meal just as there is in a symphony. It was amazing how much thought they gave to each detail of the entire dining experience! I think this is also so important in business! It is essential to create an entire client experience and to put a lot of though into each aspect of your experience. I'm learning that my client experience isn't just about showing up on a wedding day and taking pictures, it's about everything I put into the experience before and after the wedding. I'm constantly learning and trying to find ways to improve my interaction and communication with my clients throughout their entire experience with me.

I hope you found this post helpful! If you own a business, what tips do you have? What are helpful books you've read or are currently reading?

I Got My First DSLR! ...Now what?! | Part Four: Understanding Post-Processing

I'm very excited to continue this series on digital photography basics! I often have people contact me with questions after receiving their first DSLR camera and I hope this series will provide you what some helpful information to get you started on your photography journey! I received my first DSLR about six years ago and I felt pretty lost and overwhelmed in the beginning. There's so much to learn! But if you work hard and practice, I know you'll make progress and will be happy with the beautiful images you get as a result! I think photography is a skill that is so important to learn because it gives you the ability to capture important memories in a beautiful and artistic way! 

1Part One: Getting Started
2. Part Two: Understanding Exposure
3. Part Three: Understanding Gear
4. Part Four: Understanding Post-Processing

I Just Got My First DSLR

Getting it Right in Camera
This step is SO SO important! Really, I can't emphasize this enough! People seem to think that Photoshop has magical powers and that you can take a really poorly exposed picture and then just fix everything in post-processing. While there is a lot that Lightroom and Photoshop can do, that is SO not the case. Your images will always look better if you get them properly exposed in the camera as you possibly can. That's why it's so important to learn how to understand exposure and how to understand your gear.

RAW vs. JPG
I shoot all of my images in RAW and I would encourage you to consider doing that as well. Here's a few of the differences between RAW and JPG:

JPG
Jpeg files are processed right in the camera. The camera adds blacks, contrast, brightness, sharpening, etc. and then renders the file to a compressed .jpg. Because the file is compressed, a lot of the original information in the image is lost when it is saved as a .jpg.


RAW
RAW files are uncompressed and unprocessed images and they are much larger files than .jpgs.


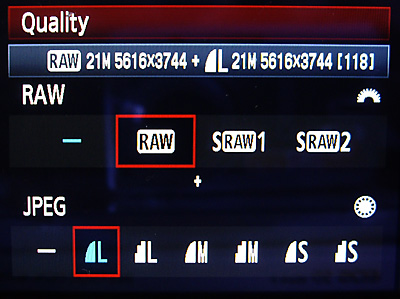
While RAW files are undoubtedly a far superior format to the .jpg because of all of the information you get from the file and the amount of changes you can make to the file, there are benefits to both image types. Shooting in .jpg can be helpful when you want to display an image right away or when you don't have post-processing software to edit your images. .Jpgs are also beneficial because they're much smaller files and so they don't take up nearly as much space on your computer or external hard drive. I often shoot in .JPG when I'm taking pictures on vacation and don't want to have to deal with a lot of editing or really large files. Shooting in RAW is best when you are in difficult or changing lighting and you want to have the ability to have enough information to edit exposure, white balance, etc. in post-processing. Shooting in RAW is also best really any time you want to have much more control over and flexibility with your image. You do need to keep in mind that if you shoot in RAW, you must do some post processing (even though it can be very minimal) because no post-processing is done for you in the camera. Another thing to keep in mind, you want to make sure that after you edit your file, you export it as a .jpg. You don't ever want to use RAW files for web or print use, they need to be edited and converted to a .jpg and then they're ready for web or print.

If you're unsure whether or not you want to shoot in RAW or .JPG, you can always shoot in both (as pictured below). This takes up more space but it gives you the option to work with both types of files! I did this a lot when I first started in photography and was still learning how to edit RAW files.


Adobe Lightroom
Adobe Lightroom is the editing software that I use 95% of the time. I use Photoshop the other 5% of the time when I need to do more major editing like photoshopping an object out of an image, making major cosmetic changes, etc. I love Lightroom and I find it pretty easy to use! I'm definitely not a software guru and I know Lightroom has a lot of features I'm not even aware of (I'm always trying to learn more about Lightroom and about post-processing and I have a long way to go!). Lightroom has also become pretty affordable! I am on a plan with Adobe where I pay $9.99/month for Lightroom and Photoshop. There's a lot more I could go into with Lightroom and I may do future posts about it, but for now, here's a few good resources: Creative Live, Digital Photography Schooland Lynda.

DiPrima Photography Office

My Preset
When editing, I make very minor changes because I like for my pictures to look very natural. I typically adjust the white balance to make my pictures warmer or cooler depending on what they need. Then I use a standard preset I've created in Lightroom to make the following adjustments:

Exposure: +0.34
Contrast: +15
Highlights: -25
Shadows: +15
Blacks: -5
Vibrance: +10

I almost always make further adjustments to my images because each picture has different needs based on lighting, white balance, etc. However, using the preset I created gives me a good starting point. I encourage you to play around and figure out your "style" because everyone is different and prefers different things!

I hope you found this helpful! If you're enjoying this series, please share it when friends and leave me feedback on other questions you have or posts you'd like to see!

I Got My First DSLR! ...Now what?! | Part Three: Understanding Gear

I'm very excited to continue this series on digital photography basics! I often have people contact me with questions after receiving their first DSLR camera and I hope this series will provide you what some helpful information to get you started on your photography journey! I received my first DSLR about six years ago and I felt pretty lost and overwhelmed in the beginning. There's so much to learn! But if you work hard and practice, I know you'll make progress and will be happy with the beautiful images you get as a result! I think photography is a skill that is so important to learn because it gives you the ability to capture important memories in a beautiful and artistic way! 

1. Part One: Getting Started
2. Part Two: Understanding Exposure
3. Part Three: Understanding Gear

I Got My First DSLR! Now What?! Part Three: Understanding Gear

My hope in this post is to help you understand the basics about photography gear and what you need to know as you begin learning about digital photography. I am by no means an expert about all the gear that is out there, I simply want to share with you some of my favorites and some things I've learned along the way! I am a Canon user and so I will be focusing on Canon products (even though there's other great brands out there!).

I plan to do a more detailed post soon on all of the gear that I use for other professional photographers. However, I will go ahead and share the main gear that I use: Canon 5D Mark III, Canon 50mm 1.2L, Sigma Art 35mm 1.4, Canon 85mm 1.8, Canon 70-200 2.8L, Canon 50mm 2.5 Macro (I'm saving up for the 100L Macro), and the Canon 600EX Speedlite.

Zoom Lenses Vs. Prime Lenses
One of the first things you need to understand is the difference between zoom lenses and prime lenses. Zoom lenses offer a range of focal lengths allowing you to zoom in and out. Prime lens have a fixed focal length and the only way to "zoom" is to physically move your body. Every photographer has different preferences and a different style, but I almost solely use prime lenses. The reason I prefer prime lenses is primarily because they produce sharper pictures and they perform better in low light settings (because you can drop your aperture down as low as 1.2 depending on the lens). However, there are benefits to zoom lenses and one of the biggest is the versatility they offer you. Zoom lenses can be better for beginners because of the versatility and flexibility and because it's easier to compose a picture since you don't necessarily need to move your body to get the shot you want. Most starter DSLR's come with a zoom lens (usually an 18-55mm).

The First Lens I recommend Purchasing: The "Nifty Fifty"
Outside of your kit zoom lens, the first lens I always recommend purchasing is whats called the "Nifty Fifty" or the Canon 50mm 1.8. The 50mm 1.8 is Canon's least expensive lens and I think it's one of the best! It's very sharp and creates great bokeh (bokeh is the blur produced in the background of pictures). The 50mm is also versatile and can be used as a portrait lens but it can also be used in a lot of other situations. I remember when I first got the 50mm and I was AMAZED at how much better the quality was than my 18-55mm kit lens.

A Great Portrait Lens: The 85mm 1.8
Another great lens that I highly recommend (and still use to this day!) if you plan to take a lot of portraits of your children, family and friends, etc. is the Canon 85mm 1.8.The 85 produces amazingly sharp pictures, gives you great bokeh, and it gives you a beautiful, creamy background because the long focal length compresses the image. The 85 can be a little tricky to use because you can't fit much in the frame and it's only good for photographing small groups or one person. It's much less versatile than the 50mm which is why I don't recommend it being the first lens you purchase, but it is an excellent lens if you want to add to your collection!

The image to the right was taken with my 85mm. See what I mean about the creaminess?!!

The image to the right was taken with my 85mm. See what I mean about the creaminess?!!

Good Options for a Beginner DSLR
There's a lot of great options out there for beginners and this list is by no means exhaustive! The first DSLR I purchased was a Canon Rebel XS which isn't even being made anymore. Canon Rebels are great options and one that I recommend is the Canon Rebel T5.or the Canon Rebel T5i. The second camera I purchased was the Canon 60D and I still recommend the 60D to beginners if you have more money to spend.

If you found this post helpful, please share it with friends! Also, please leave comments below with questions or other posts you'd like to see and check back in two weeks for my next post in this series on: "Understanding Post-Processing."

*Please note: There are affiliate links throughout this post and I make a small commission off anything you decide to purchase through my links. However, all thoughts and opinions are my own.

I Got My First DSLR! ...Now What?! | Part Two: Understanding Exposure

I'm very excited to continue this series on digital photography basics! I often have people contact me with questions after receiving their first DSLR camera and I hope this series will provide you what some helpful information to get you started on your photography journey! I received my first DSLR about six years ago and I felt pretty lost and overwhelmed in the beginning. There's so much to learn! But if you work hard and practice, I know you'll make progress and will be happy with the beautiful images you get as a result! I think photography is a skill that is so important to learn because it gives you the ability to capture important memories in a beautiful and artistic way! 

1. Part One: Getting Started
2. Part Two: Understanding Exposure

Understanding Exposure

Exposure is SO important! After getting my first DSLR, it took me several years to be able to shoot in manual. I felt so intimidated by it that I typically kept my camera in "Auto," "AV," or "TV." I wish I had challenged myself to learn how to shoot manually from the very beginning! It is overwhelming to learn at first, but once you get used to it, it's so worth it. When you can shoot in manual you have so much more control over your images and you can learn how to get clear, beautiful images in almost any situation. I promise you it's worth the effort!


1. Set Your Camera to "M"
Ok! Set your camera to "M" (Manual) and let's get started! Practice taking pictures in the shade and in full sun. Practice in a dark room a light room. Try out your settings and start to figure out what each one does by trial and error. 

2. Understand the Exposure Triangle
When I was first learning about exposure, two resources were game changers for me. The first was "Understanding Exposure" by Bryan Peterson and the second was this article from Digital Photography School. I've pulled a lot from these resources for this part of my blog.

The three elements of the Exposure Triangle are:
1. ISO- the measure of a digital camera's sensitivity to light
2. Aperture- the size of the opening in the lens when a picture is taken
3. Shutter Speed- the amount of time the shutter is open

A correct exposure is simply the combination of all three elements of the exposure triangle. When you adjust one element of the triangle, you must adjust the other elements to compensate. You can use the light meter on your camera to determine whether your image is being properly exposed. Technically a "perfect" exposure is when your light meter is on 0 (you can see the light meter in the picture below). 


ISO- The ISO is listed as ISO 100 in the image above. One way to think about ISO is as a "worker bee." The job of the worker bee is to gather light. The more worker bees you have, the more light you have. So, the higher your ISO, the more light your image will have. When I'm outside, my ISO is almost always set on 100-200. When I'm inside, my ISO can vary from 100-3000 depending on how well lit the room is and whether it's night or day. Also, the higher your ISO gets, the more grainy your image will be. So depending on what type of camera you have, your images may start to get grainy when you get past about 1000. 

Aperture- Aperture is listed as F1.8, F2, etc. The aperture is listed as F5.6 in the image above. Each change in aperture is referred to as an "f-stop." The smaller the f-stop, the larger the lens opening and the larger the f-stop, the smaller the lens opening. This means that as your f-stop gets higher, less light gets into your image. So if i'm shooting at F1.8, there's going to be a lot of light in my image and if I'm shooting at F22, there won't be much light and I will have to compensate in other ways through ISO and shutter speed. Typically, for portraits and weddings, I'm shooting at 2.8 most often. Sometimes I go down to 2.0 or 1.8 for portraits (but its taken me a few years to go down that low and still have crisp, clear images so I'd recommend staying at 2.8 or above until you've had some practice). If I'm shooting larger groups or a large room and I want almost everything in my image to be in focus, I may shoot at 5.0 or a higher aperture. In addition, the aperture affects "depth of field," so the smaller your f-stop, the smaller your "depth of field." Depth of field is "the distance between the nearest and the furthest objects that give an image judged to be in focus in a camera." So the smaller your depth of field, the more blurred most of your image will be. If you're trying to get one small part of an image in focus and the rest blurred, you want a smaller depth of field and if you want your whole image to be in focus, you want a larger depth of field.

Shutter Speed- Shutter speed controls the amount of time that the volume of light coming through the lens is allowed to stay in the camera. Shutter speed is listed as listed as 1/13 in the image above. The higher your shutter speed, the less light is getting in your camera. So if your shutter speed is 1/500, you won't get nearly as much light as if it is 1/100. However, you must always keep your shutter speed at at least twice the length of your lens to avoid blurred images. So for example, if you're shooting with a 50mm lens, your shutter speed must always be at least 1/100. In addition, if you're shooting moving objects, you'll want your shutter speed to be quicker so that you can capture the action without blurring the image. 

3. Understand White Balance
Another important part of shooting manually is "White Balance." When you're just beginning to shoot in Manual, I recommend that you just keep your white balance in "Auto." However, once you become more familiar with your camera's manual settings, you may want to start adjusting your white balance to achieve the image color you want. White balance is also something that can easily be changed in post-processing in Adobe Lightroom (we'll discuss this in a later post). However, it's always good to get as much right in the camera as possible. You will notice different white balance options on your camera (cloudy, shade, tungsten, flash, etc.). I shoot in "cloudy" mode about 90% of the time because I like my images to be warmer (more yellowish and less blue). The main other white balance setting I use is "flash" when I have my flash on my camera. If you're shooting inside a lot, you may want to become more familiar with the other white balance options. See the pictures below to see the difference white balance makes in making your image "cooler" or "warmer":

Shot in "Auto White Balance" and "perfectly" exposed (i.e. light meter on 0) in camera

Shot in "Auto White Balance" and "perfectly" exposed (i.e. light meter on 0) in camera

White balance warmed up and changed to 5594 in Lightroom and exposure bumped up to +1.0 

White balance warmed up and changed to 5594 in Lightroom and exposure bumped up to +1.0 

Once you've mastered manual exposure, you can get a little more creative with your images! It's important to remember that photography is art and so a lot of it is left up to your own personal preferences and choices. For example, I almost always "over-expose" my images a little because that is the "look" that I love. I love bright and colorful images! Sometimes I also "blow out" (or overexpose) the sky in my images to great bright, evenly lit subjects. I'd rather have a blown out sky and bright, well-exposed people then a properly exposed sky and dark subjects. But the technical rule book would tell you your whole image needs to be properly exposed. So while it's very important to understand exposure, it's ok to break the rules sometimes to in order to produce the images and the art that you want!

I hope you enjoyed this post and found it helpful (and not too overwhelming!). Check back in two weeks for my next post in this series on understanding photography gear and lenses.